Hull Painting
(scroll down to view entire page)
Painting an object of this size gave me concern. Although I have years of experience achieving reasonable results on scale models, none of them have approached this
one in terms of sheer size. I also have a bit of experience painting automobiles. This hull is sort of "in between" - much larger than the models I've built in the past,
and much smaller than a car. So I wasn't really sure what size air brush to use, or how much paint it would consume. I have the expected collection of airbrushes for
model use, in addition to full-size and "touch-up" paint guns. In the end, I decided on my trusty Badger Crescendo 175. This is an excellent gravity-feed dual-action brush,
with the added advantage of supporting three different-size needles/nozzles (fine, medium, and heavy). Most of my past work with this brush has been covering large surfaces
(wings, hulls, etc.) of smaller subjects, and the medium needle has worked well for that, so I decided on the heavy needle for this hull.
For the paint I use Model Master enamels (MMe) save for areas demanding a color which I happen to like in a different manufacturer's line. So, the first thing I did was apply
a coat of MMe White Primer to the entire hull. Unfortunately, after a week the paint had not hardened, so out came the lacquer thinner and rags. I'm not sure why this
happened - probably due to a too-thick application (thinking about it after the fact, I think I did not thin the primer enough - something I seem to do with regularity).
Regardless, I moved to an old favorite: Dupli-Color sandable Filler/Primer (p/n FP101 in grey) straight out of the rattle can. This is a lacquer primer which I find very
easy to control during application: it dries very quickly, and builds easily where you want it to. Finally, it is sandable without clogging within 30-minutes of application
on a typical (SoCal) day.
Once the hull was primed, I was able to get my first look at how the plating turned out: I must confess I was favorably pleased. The work has the subtleness I was after,
but stands out once you know it's there.
Once the primer had hardened, I inspected for imperfections and sanded lightly with 600-grit wet/dry paper using a long, flexible sanding block. I next turned to the color
coats. First I marked the waterline using a waterline marker tool. Iowa ships - at least in WW2 era, wore a boot stripe that tapered smaller aft. I replicated this by first
marking the upper edge of the stripe (which is parallel to the baseline), then shimming the aft end of the hull to mark the lower edge. I use Tamiya masking tape for the edge
line, and blue 3M painter's tape and paper for the the overspray masking.
Once the bottom paint was on I applied the uppermost (haze grey) color to the bow, followed by the main (Navy Blue) color to the hull. Finally, I used Tamiya "NATO Black"
for the boot stripe.
Use the (vertical) scrollbar at right as needed. Clicking on any thumbnail will take you to a larger version of the photo.
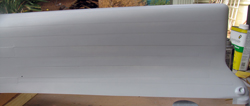 |
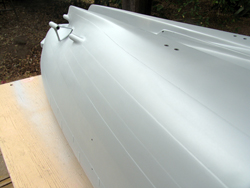
Bow area wearing fresh coat of primer. |
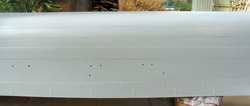 |
Forward-midship area of primed hull. Prior to painting, I installed the hull plating butt-straps and gunwale knife edge. The
plates were made of 0.005" styrene, while the gunwale was fashioned out of strips (and strips and strips...) of 0.010" styrene topped with 0.025" rod. Also
visible are some of the overboard discharge outlets I installed as part of the "irrigation system" (documented elsewhere). |
| |
|
|
|
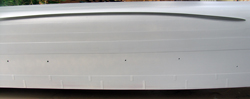 |
Midship area, again showing buttstraps and overboard discharges. Also visible are the bilge keels. Note the flange visible around
the perimeter of the keel piece. |
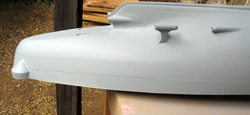 |
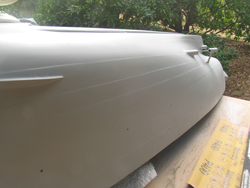
Port side stern. The strut doublers were originally of sheet styrene, but they didn't "show" well. So I stripped them off and
built the doublers up from filler. |
| |
|
|
|
 |
Another view of the stern area, showing the compound contours which make this a challenging area (again, I should have left the struts
off until after completing the plating). Also visible are the four water-chest inlets serving the irrigation system. |
 |
One more view of the stern, this time from further forward. |
| |
|
|
|
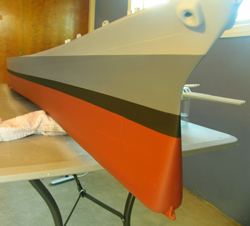 |
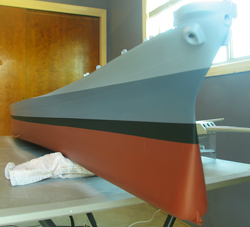
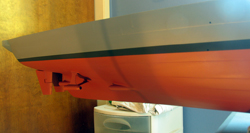
Bow viewing showing all four colors. |
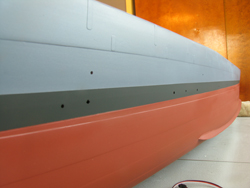 |
Looking aft along the port side, giving a good view of the plating effect, butt straps, and overboard discharge outlets. |
| |
|
|
|
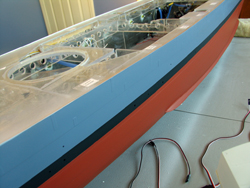 |
Midship port side, from a higher perspective. I am a horrible photographer, but trying to convey the subtleness of the plating. |
 |
Starboard side looking aft from bow (duh...). |
| |
|
|
|
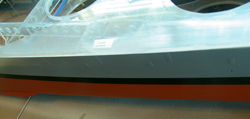 |
As may be seen is this higher-angle view, the plating all but disappears. |
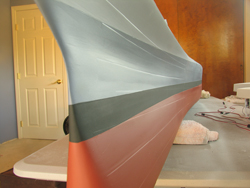 |
One more shot, this time in harsh (from a window on the right) lighting, showing the plating effect. Overall, I'm
pleased so far. |
| |
|
|
|
 |
And finally, a view of the strut/rudder area. |
|
|
| |
|
|
|